Time for some WWI naval action last night. Great fun was had, despite my poor Germans being hopelessly outmatched!
Showing posts with label wwi. Show all posts
Showing posts with label wwi. Show all posts
Sunday, March 15, 2020
Flailing About with Fletcher Pratt
Time for some WWI naval action last night. Great fun was had, despite my poor Germans being hopelessly outmatched!
Sunday, May 8, 2016
2/Worcestershire at Gheluvelt
I think that the late 19th and early 20th Centuries are a particularly interesting period of warfare. Then, as now, rapid technological changes drove development of weapons systems that were far more effective than those of the past - but too often the thinking of the officers tasked with using those weapons was mired in the past. Frequently such thinking led to horrendous casualties and, by 1915, a stalemated war of attrition in the trenches that wouldn't be resolved until the invention of new tactics and new weapons like tanks.
 |
| 2/Worcestershire preparing to advance from Polygon Woods toward Gheluvelt, near Ypres - 31 October 1914 |
Monday, September 15, 2014
Why I took up Play By Email
Last night I played scenario "1914_0823_01s: The Creeping Tide" concerning a holding action by the German 37th Infantry Division at the villages of Lahna and Orlau in the JTS game East Prussia '14. I played the German side this time, and here was the result:

Sunday, August 24, 2014
Gumbinnen - August 20, 1914 : A Review of East Prussia '14
A little over 100 years ago, the advancing troops of the Russian 1st Army met Maximilian von Prittwitz's 8.Armee at the town of Gumbinnen in East Prussia. It was the first German offensive of the the war in the east. Strategically, the battle was a German defeat. Tactically the Russians certainly didn't shine, but they held long enough, and did enough damage to the German XVII Corps to make von Prittzwitz lose his nerve and retreat. His corps commanders did not generally agree that they had been beaten.
Courtesy of the new World War I Campaigns game from John Tiller Software. East Prussia '14, I'm going to try my hand at managing a better outcome for 8.Armee.
Courtesy of the new World War I Campaigns game from John Tiller Software. East Prussia '14, I'm going to try my hand at managing a better outcome for 8.Armee.
 |
| 8.Armee positions the morning of August 20th, 1914. IArmeekorps and XVII.Armeekorps are already in contact |
Friday, February 7, 2014
Sunday, December 1, 2013
Delaying Action - An Iron Front Custom Mission
I spent most of the day messing around in the Iron Front scenario editor, learning to use it. Here are some snaps from my first complete mission: Delaying Action.
During Spring 1944 a small Kampfgruppe must hold a small Ukrainian village long enough to allow the bulk of their parent battalion to retreat to a new defensive line. I command the remnants of a platoon of Panthers, supported by a pair of infantry squads and a PaK 40. We must keep the Soviets out of the village for 20 minutes.
The Soviet force consists of three platoons of T-34/76s and three infantry squads. It is 0630, raining, and foggy.

My trusty Panther steed. It is not a nice morning here in the Ukraine.

Two of the other tanks in my platoon, moving into line.

Through the commander's vision block, overlooking the road where we expect Soviet armor.

The village we have to hold. It looks like some of the Soviet armor is moving to flank us.
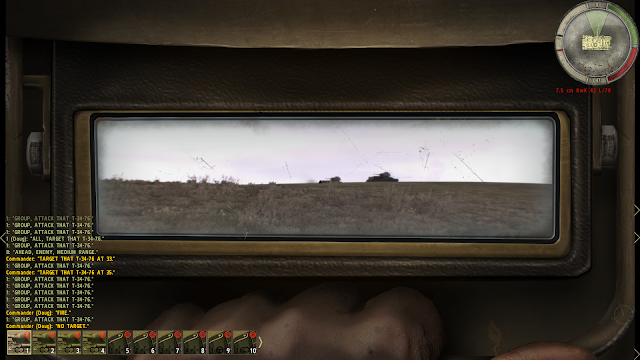
T-34s on the horizon.

The T-34s disappear in clouds of smoke as our 75mm rounds punch through their side armor.

Burning T-34s.

One of my platoon-mates maneuvering to get a clear shot.

My platoon in line, turrets turning toward more Soviet armor.

More Soviet armor tries the hill route.

It doesn't fare any better against my Panthers. I do lose a tank, however.

Shortly thereafter, tank 3 runs out of fuel.

The surviving crew of tank 4 running for cover. The hilltop is filled with burning armor.

We hunt for enemy infantry that should have been with the tanks.

Tanks in the woods. Never a good plan.

Three minutes short of the deadline, some Soviet infantry breaks through to the village. I'm going to call this a draw. My force is mostly still combat effective, and even though some Soviets made it to the village, all of their armor is gone and their infantry has taken a beating.
In my delight to charge around the map in a Panther and blow things up, I forgot/ignored everything I know about armored combat. It was great fun and the scenario generally works, though I think it needs a few tweaks yet. It should be a great tool to help me learn the editor as well as get more familiar with commanding units in Iron Front.
Saturday, November 30, 2013
Drive on Loenen
Tim from RangerX3X posted a great AAR about the Drive on Loenen scenario from Red Devils Over Arnhem/HTTR. I wondered in the comments about a more coup de main sort of approach driving straight up the middle with the 504th's battalions arranged in a classic "two up, one back" fashion. While I don't own either of the two older Panther games this scenario was included in, Tim ported the scenario to Command Ops: Battles from the Bulge so I was able to give it a try.
As Tim notes, this is a tough scenario. I gave my idea a try with a few different variants. They all came out about the same. The 504th seems to have more than enough combat power to get the job done, but the time pressure is overwhelming.

Scenario briefing and the settings I'm playing with. Playing with Realistic Orders Delay in such a time limited scenario is probably masochistic, but I'm a slave to history, I guess.

The plan is to send 1st and 2nd Battalions in an attack up the right side of the map line abreast, both in vee formation, and then on to attack the eastern objective. I'm having them attack rather than move to clear any Axis blocking forces. I've attached the AA unit to 2nd Battalion and the regimental engineers to 1st Battalion to boost the combat power of both formations.
3rd Battalion is to move to the highway to the west, up the highway to the south of the crossroads, and then attack along the road to Loenen.

By 0930 most units are in position to start attacks on the objectives. My eastern force has encountered a blocking force. My hope is that the combined firepower of two battalions and attachments will be sufficient to quickly brush aside any resistance like this.

This doesn't really work. Two hours later and the SS infantry is still in the way. I've ordered 1st Battalion to reorganize and attack north to the eastern objective south of Loenen. Meanwhile, 3rd Battalion is encountering resistance shortly after it launches it's attack.

About three hours left and we aren't making much headway. 1st Battalion is finally clearing the first objective while 2nd Battalion tries to get organized to join them. Third Battalion lacks the punch to advance to the east.

I finally take one objective and am preparing to advance on Loenen when time runs out. Every variant of this strategy I've tried has ended up this way, including the most literal interpretation of my suggested approach: 1st and 2nd Battalions forward with 3rd in reserve, straight up the forest track to attack the center objective and then on to Loenen.
I have a couple more ideas I want to try, but it's pretty clear that an infiltration strategy is a more sound approach here than trying to punch through using a PIR. That might work with an armored regiment, but the paratroopers don't provide enough shock to brush aside the blocking forces quickly.
Saturday, March 2, 2013
Supreme Commander World War I - The Guns of August Sound
In keeping with my on-going WWI theme, I've launched a grand campaign of Supreme Commander- World War I: Breakthrough! I'm playing as the Central Powers. SC- WWI is an easy game to play, and a decent representation of WWI strategic warfare at a somewhat abstracted level.
Here's the situation as of August 15th, 1914:
As happened historically, I've opened the war with an Austro-Hungarian advance on Belgrade. Four Corps assault the city, and one more advances from Sarajevo on the Serbian town of Uzice.
I've decided to deploy the AH Second Army to the Galician Front rather than Serbia. I'm concerned that the Russian attack there will be too heavy for my northern army group to stop. That's left me with forces on the Serbian Front that aren't appreciably stronger than the Serbian Army.

On the Western Front I've deployed the German II Army historically as part of the the Schlieffen Plan, rather than using them to reinforce Prussia. My initial attacks have overrun Luxembourg and Liege, mostly encircled Brussels and are threatening Antwerp, Verdun, Mons, and Maubeuge. The French have declined to launch any offensives against Metz and Strasbourg as actually happened in 1914. I've kept the armies on my left on the defensive, but it may be worth launching an assault on Belfort to try and wear down French National Morale.

I'm seeing substantial Russian forces concentrating on the Galician Front. The Russians are advancing along two paths; one from the east through the Galician Oilfields and one from the north, both moving toward the fortress of Lemberg. Lemberg, along with Przemysl are the Austro-Hungarian National Morale objectives on this front. I plan on using newly mobilized AH forces along with the 2nd Army to firm up the defensive line from Stanislaw to Tarnow and hopefully hold on to the fortresses.

In East Prussia, the Russian First Army has moved on Gumbinnen and been stopped by three Korps of the German 8th Army. An event has let me bring von Hindenburg out of retirement and pair him with Lundendorf. I've dug in a fourth Korps south of Konigsburg to help repel any Russian drive on the city as I wait for reserve Korps to be activated to reinforce my position. It also looks like a Russian attack is shaping on Memel. I expect to lose the town if attacked there; I don't have the strength at this point to stop the Russians.

I'm also going to play the Grand Campaign in AGEOD's World War One Gold to contrast the two approaches to simulating WWI on the Grand Strategic scale. Both are enjoyable games, but very different in how they play. It's great to have so many interesting WWI games available now. For a long time wargamers have seen this conflict as static and boring, particularly after the initial movement phase of 1914. These games prove that on the strategic scale WWI can be an interesting conflict to simulate.
Here's the situation as of August 15th, 1914:
As happened historically, I've opened the war with an Austro-Hungarian advance on Belgrade. Four Corps assault the city, and one more advances from Sarajevo on the Serbian town of Uzice.
I've decided to deploy the AH Second Army to the Galician Front rather than Serbia. I'm concerned that the Russian attack there will be too heavy for my northern army group to stop. That's left me with forces on the Serbian Front that aren't appreciably stronger than the Serbian Army.
On the Western Front I've deployed the German II Army historically as part of the the Schlieffen Plan, rather than using them to reinforce Prussia. My initial attacks have overrun Luxembourg and Liege, mostly encircled Brussels and are threatening Antwerp, Verdun, Mons, and Maubeuge. The French have declined to launch any offensives against Metz and Strasbourg as actually happened in 1914. I've kept the armies on my left on the defensive, but it may be worth launching an assault on Belfort to try and wear down French National Morale.
I'm seeing substantial Russian forces concentrating on the Galician Front. The Russians are advancing along two paths; one from the east through the Galician Oilfields and one from the north, both moving toward the fortress of Lemberg. Lemberg, along with Przemysl are the Austro-Hungarian National Morale objectives on this front. I plan on using newly mobilized AH forces along with the 2nd Army to firm up the defensive line from Stanislaw to Tarnow and hopefully hold on to the fortresses.
In East Prussia, the Russian First Army has moved on Gumbinnen and been stopped by three Korps of the German 8th Army. An event has let me bring von Hindenburg out of retirement and pair him with Lundendorf. I've dug in a fourth Korps south of Konigsburg to help repel any Russian drive on the city as I wait for reserve Korps to be activated to reinforce my position. It also looks like a Russian attack is shaping on Memel. I expect to lose the town if attacked there; I don't have the strength at this point to stop the Russians.
I'm also going to play the Grand Campaign in AGEOD's World War One Gold to contrast the two approaches to simulating WWI on the Grand Strategic scale. Both are enjoyable games, but very different in how they play. It's great to have so many interesting WWI games available now. For a long time wargamers have seen this conflict as static and boring, particularly after the initial movement phase of 1914. These games prove that on the strategic scale WWI can be an interesting conflict to simulate.
Sunday, February 24, 2013
Troubridge Takes on The Goeben
One of the most speculated on hypothetical naval engagements of WWI involves the squadron of armored cruisers under Vice Admiral Troubridge attempting to stop the German battle cruiser Goeben as it breaks for the Aegean at the beginning of the war. In reality Troubridge stopped the pursuit before engaging, convinced that he was outgunned by the Goeben. For that he was tried (and exonerated) for cowardice.
Both Steam and Iron and Jutland have Goeben scenarios available for them (the scenarios for Jutland are user-created, since the game itself doesn't cover the Med). JC over at Real and Simulated Wars covered the Steam and Iron scenario last year, which I've also played.
Below are a few screenshots from a recent attempt at the Jutland version. Unfortunately I had to terminate the scenario early, so I won't be doing a complete AAR at this point. Suffice to say that Admiral Troubridge's concerns turned out in this case to be well-founded.

The Jutland scenario is different from the SAI scenario, in that in SAI, the three destroyers Troubridge had with him are available. Here, the RN has only the CAs.


I've played a number of the smaller scenarios now in both SAI and Jutland. Next week, I plan on taking on something at least the size of Dogger Bank.
Both Steam and Iron and Jutland have Goeben scenarios available for them (the scenarios for Jutland are user-created, since the game itself doesn't cover the Med). JC over at Real and Simulated Wars covered the Steam and Iron scenario last year, which I've also played.
Below are a few screenshots from a recent attempt at the Jutland version. Unfortunately I had to terminate the scenario early, so I won't be doing a complete AAR at this point. Suffice to say that Admiral Troubridge's concerns turned out in this case to be well-founded.
The Jutland scenario is different from the SAI scenario, in that in SAI, the three destroyers Troubridge had with him are available. Here, the RN has only the CAs.
I've played a number of the smaller scenarios now in both SAI and Jutland. Next week, I plan on taking on something at least the size of Dogger Bank.
Sunday, February 17, 2013
Coronel AAR 1 - Steam and Iron
I've been bitten by the naval wargaming bug the past few days. This happens every so often; this time it seems to have manifested as an interest in the dreadnought battles of WWI. As I result I've dusted off (meaning updated) my copy of NWS' Steam and Iron and I purchased the flawed-but-still-interesting Jutland from Stormeagle Studios. It's interesting to play the same scenario in both games. SAI is a 2D, graphically plain but highly detailed game, while Jutland is a 3D ship simulation.
Today I'm playing Coronel, an engagement between the Imperial German East Asia Squadron under Vice Admiral Graf von Spee and a British Squadron under Rear Admiral Sir Christopher Craddock. The battle happens off the coast of Chile near the port of Coronel. The East Asia Squadron is composed of the Armored Cruisers Scharnhorst and Gneisenau and the Light Cruisers Dresden, Leipzig, and Nurnberg. Craddock's Squadron is made up of the Armored Cruisers Monmouth and Good Hope, the Light Cruiser Glasgow, the Merchant Cruiser Otranto, and the aging pre-Dreadnought battleship Canopus. Craddock has left HMS Canopus behind in his efforts to locate the East Asia Squadron, due to her slow speed and poorly-trained crew. He's significantly out-gunned by the Imperial German squadron.
Given my lack of familiarity with the systems and tactics of the time, I'm going for the easy win here and playing the Germans. The German objective is to sink the two British Armored Cruisers. The British win if they can avoid that and manage to sink any single large German ship (meaning either of the two CAs).

The fight opens with SMS Leipzig identifying HMS Glasgow and HMS Otranto as the main force of the Far East Squadron proceeds SSW. Leipzip and Glasgow exchange some long-range gunfire.

The German ships turn west to bring more guns to bear on HMS Glasgow. After a few minutes, they run across the British main body, steaming south. The German battle line turns SW, closing the distance between the two groups and engaging in a running gun battle.

German gunnery soon takes it's toll, and a turret flash fire causes CA Monmouth to explode.

Leipzip has taken a hit that slows her to under 20 knots, making it difficult for her to continuing scouting/screening in front of the German CAs. Scharnhorst has also taken some light damage, but the German main body of the two CAs and the CL Dresden continue to close on the remaining British CA, HMS Good Hope.

Soon HMS Good Hope begins taking hits from the combined fire of the German CAs.

Soon enough, like her consort, HMS Good Hope takes a magazine hit and explodes!

Objectives achieved but with time left in the scenario, there was nothing left to do but some mopping up. The British light ships had fled to the west, but damage in the early phases of the engagement slowed their top speed. The Germans were able to catch HMS Glasgow and pounded her with gunfire until she too sank, as night fell.
Historically, HMS Monmouth and HMS Good Hope were sunk, but both HMS Glasgow and HMS Otranto escaped. HMS Glasgow was part of the British squadron the destroyed and sunk nearly the entire East Asia Squadron a month later off the Falklands.

The toll for Craddock's squadron was heavy. Note the presence of the undamaged battleship on the British side (the "B" designation}. That's HMS Canopus which played no part at all in the battle, and which I never even sighted.

A nice feature of Steam and Iron is the ability to plot the track of the fleets during the battle for later examination. I love how this plot looks so similar to naval battle maps you might find in a military history book!
Now it's time to fire up Fraps and Jutland, and grab some screen caps of the same battle in 3D.
Today I'm playing Coronel, an engagement between the Imperial German East Asia Squadron under Vice Admiral Graf von Spee and a British Squadron under Rear Admiral Sir Christopher Craddock. The battle happens off the coast of Chile near the port of Coronel. The East Asia Squadron is composed of the Armored Cruisers Scharnhorst and Gneisenau and the Light Cruisers Dresden, Leipzig, and Nurnberg. Craddock's Squadron is made up of the Armored Cruisers Monmouth and Good Hope, the Light Cruiser Glasgow, the Merchant Cruiser Otranto, and the aging pre-Dreadnought battleship Canopus. Craddock has left HMS Canopus behind in his efforts to locate the East Asia Squadron, due to her slow speed and poorly-trained crew. He's significantly out-gunned by the Imperial German squadron.
Given my lack of familiarity with the systems and tactics of the time, I'm going for the easy win here and playing the Germans. The German objective is to sink the two British Armored Cruisers. The British win if they can avoid that and manage to sink any single large German ship (meaning either of the two CAs).
The fight opens with SMS Leipzig identifying HMS Glasgow and HMS Otranto as the main force of the Far East Squadron proceeds SSW. Leipzip and Glasgow exchange some long-range gunfire.
The German ships turn west to bring more guns to bear on HMS Glasgow. After a few minutes, they run across the British main body, steaming south. The German battle line turns SW, closing the distance between the two groups and engaging in a running gun battle.
German gunnery soon takes it's toll, and a turret flash fire causes CA Monmouth to explode.
Leipzip has taken a hit that slows her to under 20 knots, making it difficult for her to continuing scouting/screening in front of the German CAs. Scharnhorst has also taken some light damage, but the German main body of the two CAs and the CL Dresden continue to close on the remaining British CA, HMS Good Hope.
Soon HMS Good Hope begins taking hits from the combined fire of the German CAs.
Soon enough, like her consort, HMS Good Hope takes a magazine hit and explodes!
Objectives achieved but with time left in the scenario, there was nothing left to do but some mopping up. The British light ships had fled to the west, but damage in the early phases of the engagement slowed their top speed. The Germans were able to catch HMS Glasgow and pounded her with gunfire until she too sank, as night fell.
Historically, HMS Monmouth and HMS Good Hope were sunk, but both HMS Glasgow and HMS Otranto escaped. HMS Glasgow was part of the British squadron the destroyed and sunk nearly the entire East Asia Squadron a month later off the Falklands.
The toll for Craddock's squadron was heavy. Note the presence of the undamaged battleship on the British side (the "B" designation}. That's HMS Canopus which played no part at all in the battle, and which I never even sighted.
A nice feature of Steam and Iron is the ability to plot the track of the fleets during the battle for later examination. I love how this plot looks so similar to naval battle maps you might find in a military history book!
Now it's time to fire up Fraps and Jutland, and grab some screen caps of the same battle in 3D.
Subscribe to:
Posts (Atom)