
Today I’m giving a brigade-sized scenario a try. This scenario portrays the (very) hasty attack of a combined arms task force of the 2nd Canadian Armoured Brigade composed of elements of the 1st Hussars and Queens Own Rifles to capture the village of Cheux, one of the original D-Day objectives. This attack was originally suppose to happen on June 12, 1944, but was suddenly advanced to June 11th to support a larger scale British attack. Advancing the timing of the attack didn’t allow the Canadians ample time to organize and plan the attack. The battlegroup was supposed to quickly seize the undefended village of Le Mesnil-Patry and proceed on toward Cheux. Unfortunately for the unprepared Canadians, Le Mesnil-Patry was held by elements of the 12th SS-Panzer Division Hitlerjugend. The Steel Chariots site has an excellent write-up of the action.

Here’s a diagram of the historical attack by the Canadians and the counter attacks launched by 12 SS-Panzer. Simultaneously there is another attack moving up the valley of the Meu conducted by the Fort Gary Horse.

Unlike the hapless Canadians, I’m aware that the SS are emplaced around my objectives and am determined to not take a drubbing that recalls history (I already managed that the first time I tried this scenario!). I’m finding this to be a great scenario for really learning how to control my troops and conduct an attack using the Panzer Battles system.
As in reality, the road leading into the town of Norrey-en-Bessin is mined on the west side, preventing me from using the rail line as my start line for the attack. Instead, I need to advance into Norrey, launching my attack from its western outskirts and advancing west toward the objectives. The clock is ticking; this is a short scenario of only eight turns. I don’t have a lot of time to carefully deploy my troops before advancing.
My plan is to attack due west across the fields and along the road from Norrey with B Squadron and accompanying infantry (D Coy QOR) to take the chateau objective in the center of the map, on the east side of Le Mesnil. If the attack succeeds, B Squadron will press through the village to the primary objectives along the road. C Squadron, the next in the line of march, will pass through Norrey and exit to the south moving up the valley of the Meu under cover and attacking Le Mesnil from the south. A Squadron, which has very little attached QOR infantry, will pass through Norrey and then attack the northern-most objective located in the woods/orchards north of the chateau and then support B Squadron’s advance.
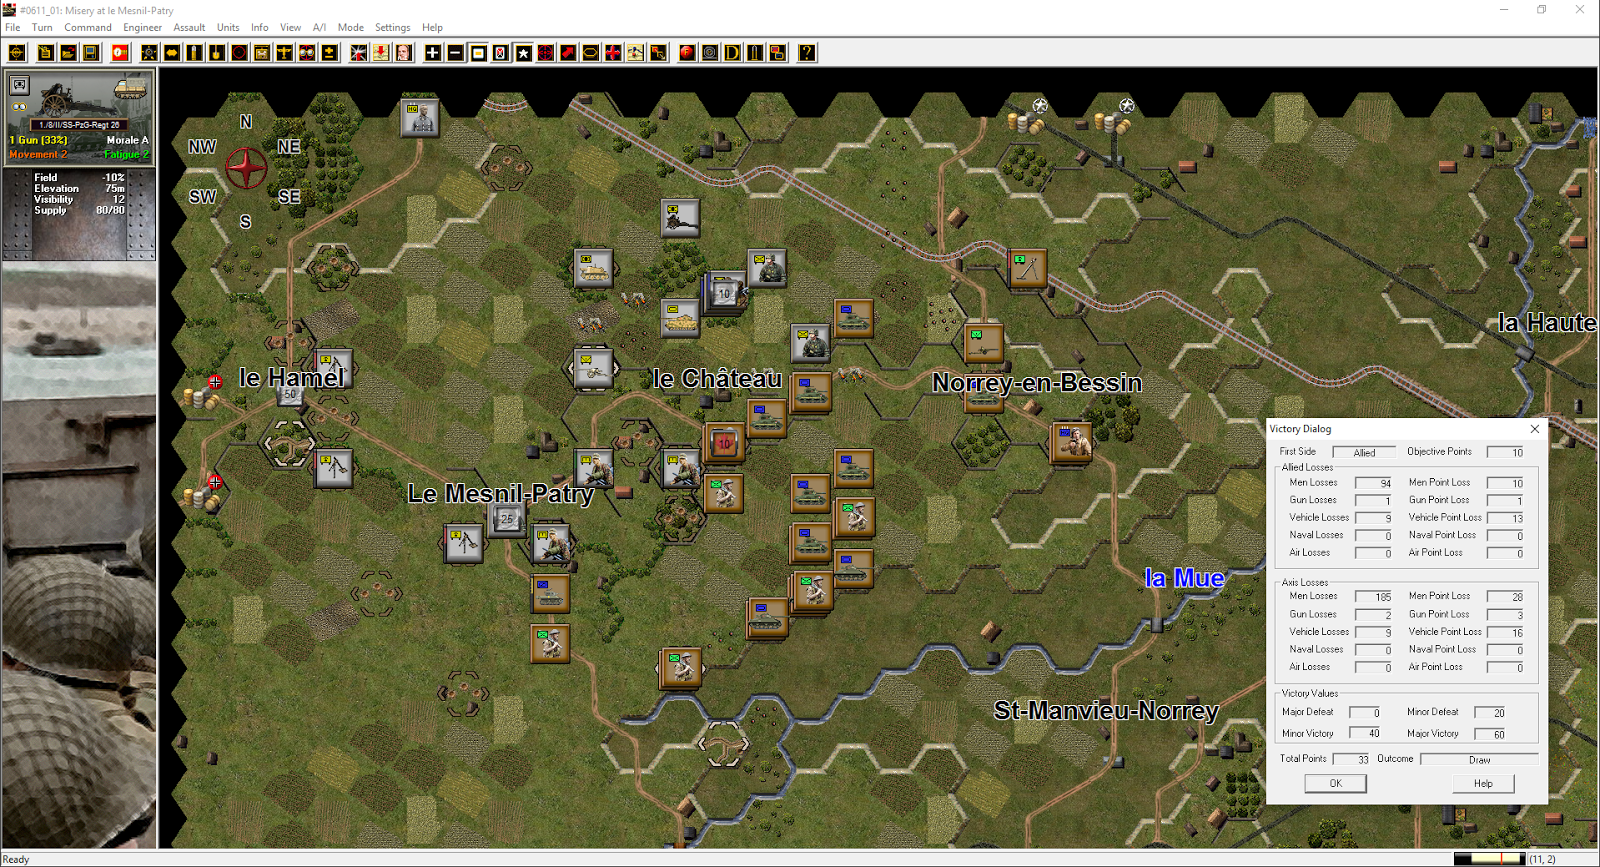
As can be seen above, it takes me until turn three to even get B Squadron/D Company to the start line of the attack. As they move into position, they come under fire from some anti-tank guns and SP artillery.

By the end of the Allied phase of Turn 3, B Squadron has taken up a support by fire position in the fields east of the chateau objective and three platoons of D Company QOR are advancing down the road. Anti-tank and artillery fire disrupted an A Company platoon prior to them dismounting the tanks they were mounted on, and I’ve held them back to recover. Meanwhile C Squadron has passed through Norrey and is starting an advance up the Meu valley, accompanied by two platoons of the Regina Rifles that were holding the town.
Frankly, this is where things go really ahistorical. I’m not leaving any reserve in Norrey to speak of. I seriously doubt my superiors would allow me to strip the defensive line the way I have.
My own anti-tank and mortar section support units are painfully slow to get into position.

Turn 5 and all of my units are out of travel mode and all the infantry is dismounted. D Company QOR has run into resistance at the chateau in the form of a company of SS Panzergrenadiers. Under the cover of artillery and tank fire I manage to advance three D Company platoons close to the objective without much in the way of losses. A Squadron advances west along the road and comes under fire from AT guns and a platoon of Panzer IVs, losing a Sherman. C Squadron, elements of C Company QOR and the infantry from the Regina Rifles push down the Mue valley. Thier advance is checked by fire from a dug-in Panzergrenadier company. I decide to try and bypass this obstacle with the 1st Hussar’s recon platoon, crossing the river and trying to use the road network to get behind them.
A note about tactics: as I’ve painfully learned, Panzergrenadier infantry are well-equipped with anti-tank weapons. Closing with them in tanks if they aren’t disrupted is a great way to lose a bunch of Shermans. Better to keep the tanks in a Support by Fire position and use them in a direct fire infantry support role, and only move them adjacent to disrupted infantry just prior to an assault. Don’t even consider assaulting undisrupted infantry that is dug-in or in constricted terrain with just armor. As is historically correct, you’ll draw back a bloody stump!
Conversely, tanks in open terrain with room to maneuver are deadly versus infantry. Always try and gain fire superiority. Avoid overstacking in a hex – you will take increased casualties.

D Company QOR takes the chateau objective after sustained artillery, mortar and tank fire wipes out the Panzergrenadiers. Unfortunately, there’s an SS Pioneer company dug into the woods in the adjacent hex who immediately take the Canadian infantry under fire. Throughout the battle area the SS troops are on the move, forming for a counterattack. Even the Panzergrenadier company holding the approaches to Le Mensil-Patry from the Meu valley has picked up and left, moving to support the Pioneers at the chateau.
At the beginning of Turn 6 A Squadron in nearly at the orchard objective with half of their remaining tanks. AT fire has accounted for another Sherman on the road. The other half are in a Support by Fire position threatening the advancing SS Panzergrenadiers and Panzers. Finally, my anti-tank section is in place to where it can at least see the enemy, though most of them are still out of range.
In the Axis half of Turn 6 the SS Pioneer company mounts an assault on the undisrupted D Company platoon at the chateau. Doing that sort of thing is no easier for the AI than it is for me, and the attack is repulsed – with heavy loses on both sides. Tank fire from A Squadron also finally takes out one of the SP artillery vehicles that have been harassing us.

During Turn Six, A Squadron occupies the orchard objective with two tank platoons, and the remainder of the A Squadron tanks move north in support. Unfortunately, A Squadron was stripped of supporting infantry by an early disruption and the Hitlerjugend thugs have taken exception to Canadian tanks in their orchard. Along with another counterattack at the chateau, the SS attack the orchard in force, with three Panzergrenadier companies and three tank platoons.
One A Squadron Sherman platoon is disrupted by infantry anti-tank fire during Turn 6, and I withdraw them a safe distance during my phase of Turn 7. I know what’s coming and disrupted tanks will be easy pickings for assaulting German infantry. As expected, the SS assault comes during Turn 7, returning the orchard objective to German control and destroying another Sherman.
On the plus side, tank and anti-tank fire during turns Six, Seven and Eight take a serious toll of both Panzers and infantry. Half of the infantry company advancing from the south to try and support the Pioneers near the chateau are destroyed. The Pioneer company itself is disrupted and badly shot up, while the objective itself is reinforced by another infantry platoon.
I try and finish off the Pioneers with an assault of my own from the fields to the east of their position. This was a bad idea on my part. The assaulting infantry was fairly shot up and with low morale, and the assault had to cross a low wall against dug-in troops. Even though the Pioneers were already disrupted my infantry got the worst of it, and are out of the remainder of the fight.
C Squadron just had too far to go and not enough time. I should have gone with a plan and deployment more like the 1st Hussars used in the actual battle and used C Squadron against the northern objective while holding A Squadron as a reserve/base of fire in Norrey. As a last ditch effort I make a run for the Le Mesnil objective with the 1st Hussar Recon Platoon backed up by some Regina Rifles infantry. It isn’t enough. The village is held by more infantry and Pioneers, and I lose two of the three Stuarts in the Recon Platoon for my troubles.
In the end I pull off a draw, and I’ll take it with a smile on my face in this scenario. As in Battles of Kursk: Southern Front (or any other WWII game, for that matter) German troop quality is telling. In an engagement this early in the Normandy fighting the Allied troops are just not as good as their more experienced German counterparts, and it shows. The poor 1st Hussars, after being the hardest hit Canadian armoured unit on D-Day, received 20 replacement tanks and crews mere hours before being thrown into this poorly planned attack. It’s no wonder that the attack turned into chaos and a great many of them didn’t make it back.
In my case I was able to keep things better in hand, mostly by already knowing that the SS were out there and not dashing right into their positions. The allies took 94 casualties and lost one gun and nine tanks, versus 185 German casualties, two guns and also nine tanks lost. Had I held on to the orchard objective, which I could have probably managed by tasking C Squadron/C Company with capturing it, I would have maintained the points for a Minor Victory.
This was a very interesting scenario, both in terms of learning more about the Panzer Battles game mechanics but also learning more about the actions the Canadians were involved in during Normandy. I’m looking forward to playing more of this game.
Doug,
ReplyDeleteThat's a nice after action report!
Glad your enjoying the game. Normandy has much more depth than Kursk, in the main due to the forces employed and the longer time frame.
Of interest, Cristot and le Hamel complement the scenario you played.
David
Thanks David! You guys did an outstanding job on this one! Between what's coming out with Panzer battles and the work Ed has done on the WWI games, JTS is putting out some of the highest quality computer wargaming around these days.
DeleteI started Cristot last night. Playing the combined Le Hamel scenario is very much in my plans. I'm also giving serious consideration to working up a set of Operation Jupiter scenarios.
Operation Jupiter - That's the nicest thing about the game. The map is big enough and the OB complete enough that you can model almost any engagement from June to August 1944.
ReplyDeleteWe have also got a number of new designers interested in the game system and their work is featured in Normandy. That takes so much work off me and allows me to drive a lot of the additional content that came with the game. I'm excited to have people of Chris Maiorana's capabilities now assisting and hopefully we can leverage him and the other newcomers going forward.
Enjoy Cristot/le Hamel - good fun little scenarios.
David
This comment has been removed by the author.
ReplyDeleteI really enjoyed your AAR. Do you have any advice for the best way to start the scenarios for Gold and Juno beaches? I am at a loss right now whether to use artillery (i.e. ships). Do I use smoke to cover the beaches on my approach or do I hit the bunkers that line the beaches?
ReplyDeleteThanks Rick! I'll be honest - I've yet to actually try the landings. Based on my experience so far though I'd drop ass much smoke as I could first to allow the troops to get on the beach and advance closer to the bunkers, and then pound the bunkers every turn thereafter. Mostly you'll get "No effect" results I'd guess, but you want to hope for lucky disruptions.
DeleteBunkers are tough. You want to move infantry to isolate them, which makes them easier to assault even if the troops inside aren't disrupted yet. Keep the tanks/guns back at least one hex (but no more than three!) and hit them with as much direct fire, arty and air strikes as you can. Concentrate your firepower on one or two; don't spread it out or you'll never break through. Be cautious about overstacking hexes though!
Hope that gives you a few ideas. I'll take a swing at a landing scenario in the next few days and post some insights if I have any.
Hi Rick,
ReplyDeleteShort and sweet for the British beaches you have the advantage that a decent amount of armor lands in the first wave. This is the key. Ship bound artillery fire will do little to bunkered troops, though any German artillery in open positions are open game. You will also get some single use heavy bombers, do use these on bunkers.
Get your engineering tanks forward and clear any obstacles, even if this means going adjacent to bunkers. Also note the ARVE Churchills are specifically for destroying bunkers and have to be one hex away from the target.
My preferred way is not to isolate a bunker, but put direct fire onto it until you disrupt the occupants and then assault it. They will retreat if not isolated and are then easy meat for following units/artillery. If the target bunker is only occupied by an MG unit assault it straight away, preferably with a full infantry company (combined). It will only last an assault or two.
Once you take one bunker the whole defensive line is compromised, please note though that the poulder at Gold will be an impediment for armor and a road will have to be a priority for capture and clearance to exploit beyond the beach.
It's worthwhile trying the British landings and then doing Omaha. It's a great lesson on why the landings fared so differently.
David